


Segmented Greaves

I've always loved the idea of having my own armour, so when I had a good look at some images on google, I realised it couldn't be too hard to make a simplified version with cardboard and other easily accessable materials.
Pintrest- www.pinterest.com/ruthmichaelaj
Instagram- www.instagram.com/ruthjohnsoncreations
Step 1
You will need: fabric, I used silver as it looked
metalic and went with the rest of my cosplay outfit,
but faux leather would look cool and work well too. Cardboard; you'll need the stuff without the holes in it, so just some sturdy card will do. Split pins/brads, I used ones with pearls in them to match my crown and jewlery. Foam, this is optional, its used for extra detail but isnt nescasary. PVA or fabric glue, fat black ribbon, old leather lace up shoes (or an alternative to tie up at the back), Pliers, black marker.


I always sketch out my designs to see how I'm going to make it all work as you can see above, then take measurements. Measure your pieces out on cardboard; you'll need to measure your leg to get the length and width of your pieces. I took the total length of my shin, devided into the amount of pieces there were (adding 1cm edging allowance when marking cardboard.) This can be seen in the above right image. measurements and shapes are always approximate, just so long as its not majorly too big or small it will work out. :)
Step 2


Step 3

Now we measure out the fabric for each piece, again leaving about 2cm edging to fold over for a neat finish.
Step 4

It's time to glue the card onto the fabric now, I just used PVA. once this has been left to dry for a suitable amount of time (I left mine overnight) cut the corners so you can make neater edges when you fold over the excess.

Step 5

Now fold over the fabric and glue- I found I needed pegs to hold it down firmly, again, leave until dry.

Step 6

Once all the silver favric has dried on, I rimmed the edges with black, this is optional but I think it looks better as it makes the seperate segments stand out more. Again, peg and let dry.

Step 7
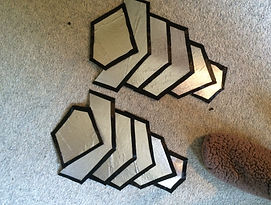
Now leave to dry as long as needed. Once done, lay out as shown above and line up corners to attach.

Now use a hammer/nail to punch clean holes for the split pins to go through. (Use plenty of pins to have a sturdy finish) more can be added for visual appeall too.
Step 8


Step 9


Then, to attach to your leg, punch holes through old lether shoes, (or whatever else is convenient to you, I just had some old worn out school ones lying around) attach them at the back with more split pins.

Step 10

Once this is all done, lace them up (although store flat) and your done! :)
(You may find it easier to unlace them when putting on your leg unless you have super long laces.)
Step 11 - Final Product


Photoshoots:
